Hardlymoving writes about do-it-yourself automobile maintenance on various makes and models.
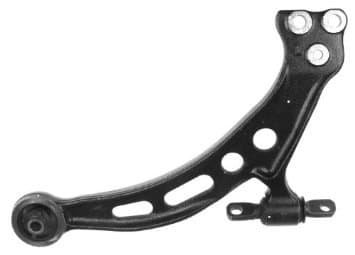
Control arm (suspension arm) for Camry
Lower Control Arm Overview
This do-it-yourself article provides instructions for replacing either the driver- or passenger-side lower suspension control arm on Toyota and Lexus vehicles, including:
- RX300 '99-'03
- ES300 '92-'01
- Avalon '95-'97
- Camry '97-'01
This article shows the control arm being replaced on a 1997 Toyota Camry; the video at the end of the article shows the control arm and other suspension parts being replaced on a 2001 Avalon.
Note: Early model vehicles have their sway bar link attached to the control arm itself instead of to the suspension strut.
A visual inspection of the control arm bushing can be deceiving. If you can see minute cracks, with the wheels off, the bushing may still be in reasonable condition. However, the crack(s) may be hiding a larger rubber separation that can only be seen after removing the control arm, inserting a metal rod in the rear bushing's metal sleeve, and wiggling it. In a worst-case scenario, the rear bushing's rubber may break away from the bushing's outer casing, which will result in steering control issues during acceleration, braking, and riding on rough pavement.
Indications of Worn or Broken Control Arm Bushings:
- When accelerating from a stop, the car erratically changes steering direction.
- When accelerating and turning from low speed, you feel a thumping or tugging sensation is noticed (shaking or shimmying of the steering wheel).
- Front end makes a clunking noise going over bumps (this noise could also be caused by sway bar links and bushings).
- Premature wear of the front tires. Center treads may appear scuffed.
The symptoms above might also be caused by wear to the ball joints, outer and inner tie rod ends, struts, strut mounts, sway bar bushings and links. With high-mileage vehicles, my preference is to replace many of these items at the same time, to provide long-term labor savings for the customer.
Should I Replace Just the Bushings, or the Entire Control Arm as Well?
I think it's more convenient to replace the old control arm with a new one, along with new bushings. Although it's true that new bushings (in both front and rear) are about half the price of a new control arm (at least for a Camry), if you don't have a high-pressure press, you will have to ask a machine shop to take the old bushings out of the arm. This means you have to drop off the control arm, wait for the bushings to be replaced, pick up the control arm, and pay for the labor.
How Is the Control Arm Attached?
The control arm, which bolts to the front sub-frame of the vehicle, contains two rubber bushings: the front, which usually maintains its integrity, and the rear, which absorbs the most stress and hence may eventually split or break. The other end of the control arm is attached to the steering knuckle via the lower ball joint. With most Toyota vehicles, the control arm is bolted to the ball joint, which makes it relatively easy to remove the control arm.
What Do Most Repair Shops Charge to Fix/Replace a Control Arm?
I have seen typical quotes of $350 to $400 per wheel for parts and labor, whether they put in a new control arm complete with bushings, or just replace the front and rear bushings. I have never encountered a bent or damaged control arm, so replacing just the bushings as opposed to replacing the control arm makes no difference in the way the car drives.
How Long Does It Take to Replace a Control Arm?
With the correct tools on hand, it will take approximately one hour at a moderate pace. Add around 1/2 hour if replacing the bushings using a hydraulic press.
Typical Toyota Control Arm Diagram

Diagram of Toyota Camry control arm assembly
Control Arm Removal Process
1. Disconnect the sway bar link from the suspension strut. This must be performed on both the driver and passenger side. This will allow the sway bar to be rotated away from the control arm which will ease removal and installation.
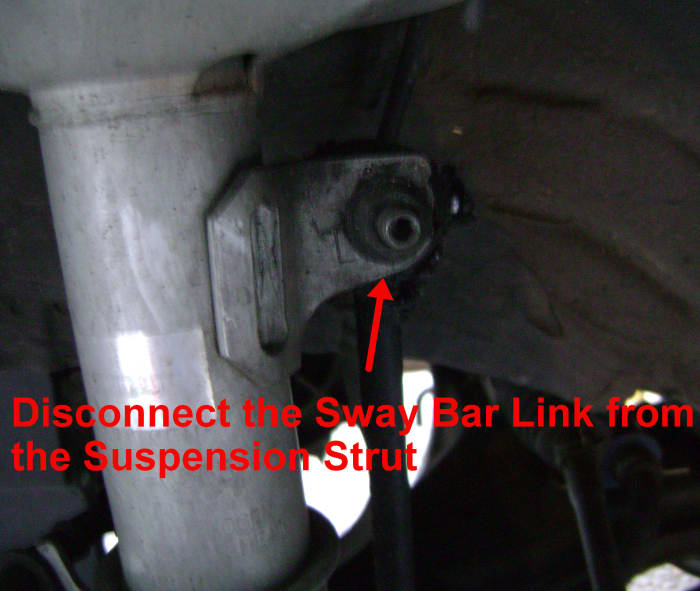
Camry suspension strut sway bar bracket
Read More from AxleAddict
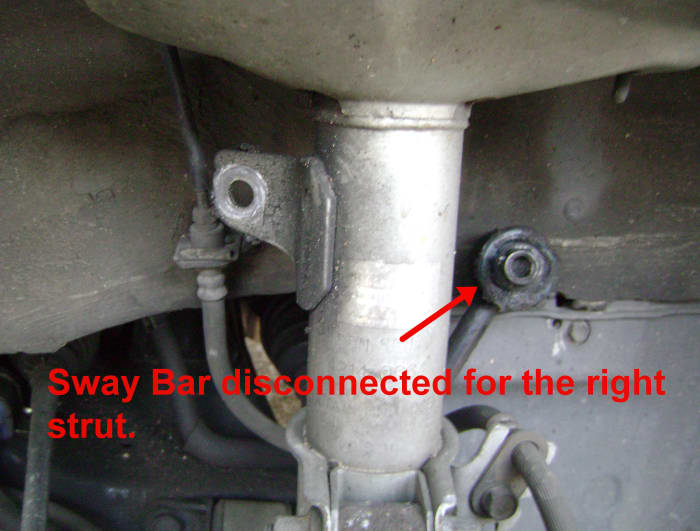
2. Position the sway bar link away from the suspension strut assembly.
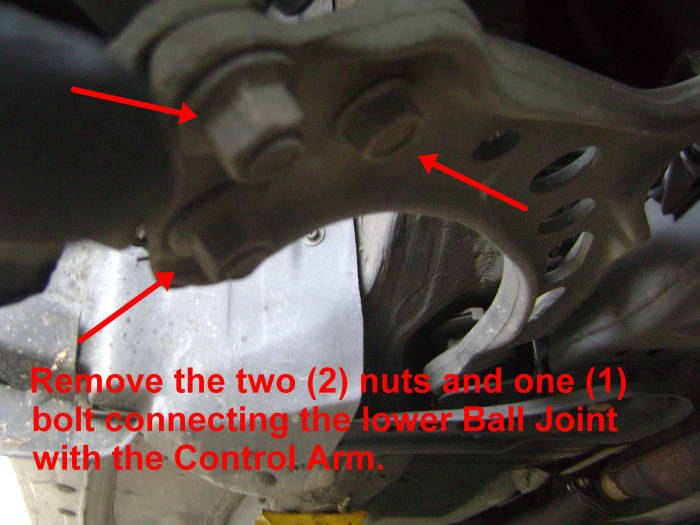
3. Detach the lower portion of the ball joint from the control arm. A breaker bar or high-torque impact driver may be needed to loosen the two (2) nuts and one (1) bolt that secure the ball joint to the control arm; they are usually on very tight. I find both these tools very useful to have around when working on cars, and worth the investment.
Note: If you buy a control arm with a new ball joint attached, you can detach the ball joint from the steering knuckle. This involves:
- Removing the locking nut from the axle shaft.
- Detaching the suspension strut from the steering knuckle.
- Pulling the axle shaft from the steering knuckle to expose the ball joint nut for removal.
- Removing the ball joint nut.
- Using either a pickle fork or a ball joint removal tool to separate the ball joint shaft from the steering knuckle.
Here's an article with illustrated instructions for replacing the ball joint.
Camry ball joint bolt and nut
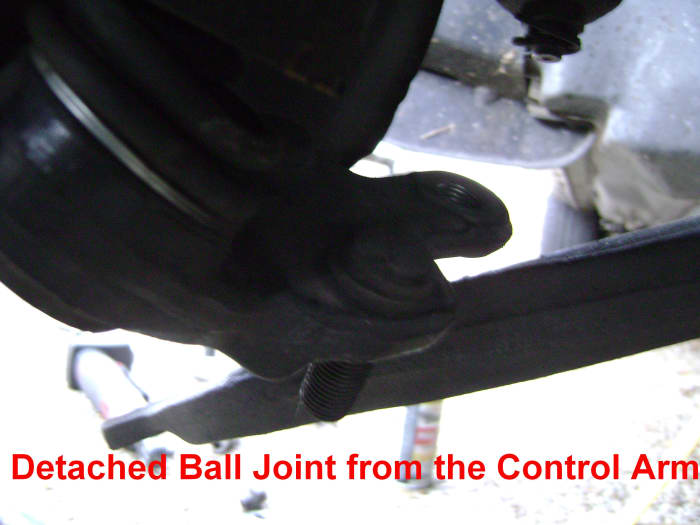
4. Separate the control arm from the ball joint by pressing down on the control arm until the ball joint studs clear the control arm holes. Then swing the ball joint away from the control arm.
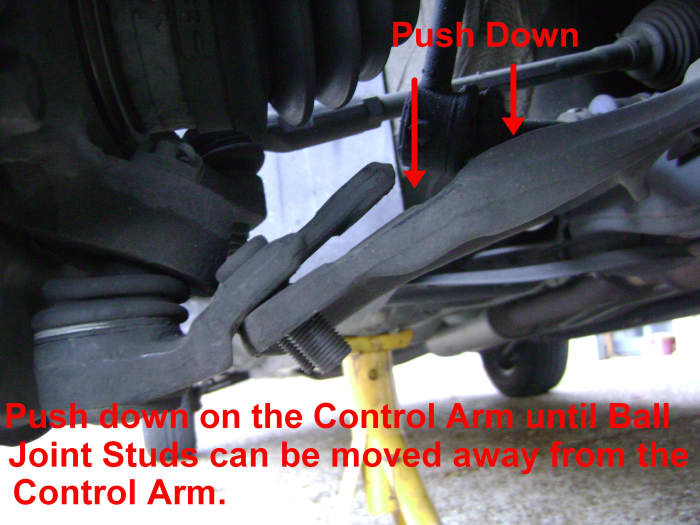
Camry Control Arm / Ball Joint Separation
5. Remove the front control arm bushing bolts. These are torqued on very tight and require either a breaker bar or high-torque impact driver to loosen.
Note: The rear bolt is longer than the front bolt.
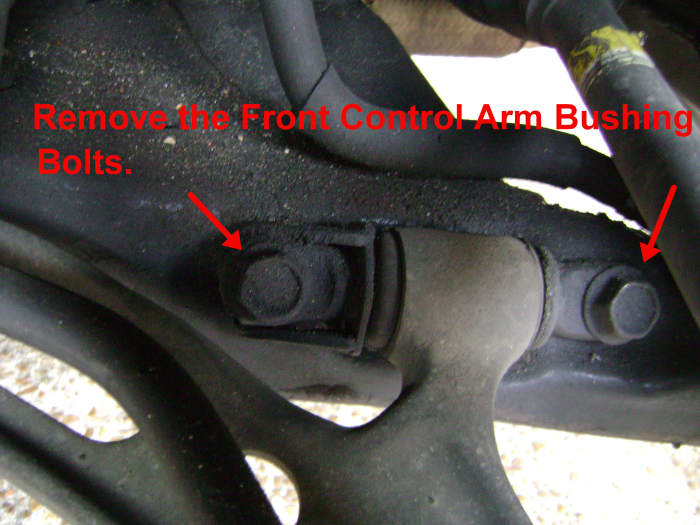
Camry front control arm bushing bolts
6. Remove the rear control arm bushing bolt. Apply some penetrating oil to ease removal. The nut that secures the bolt contains a tab to prevent it from spinning when loosening or tightening torque is applied to the bolt. There is very little clearance to insert an open-end wrench to stop the bushing nut from spinning. Let the tab do its job; however, do not let the nut get lost inside the top of the rear control arm mounting frame. Use your fingertips to gently pull the nut out after it has spun free from the bolt.
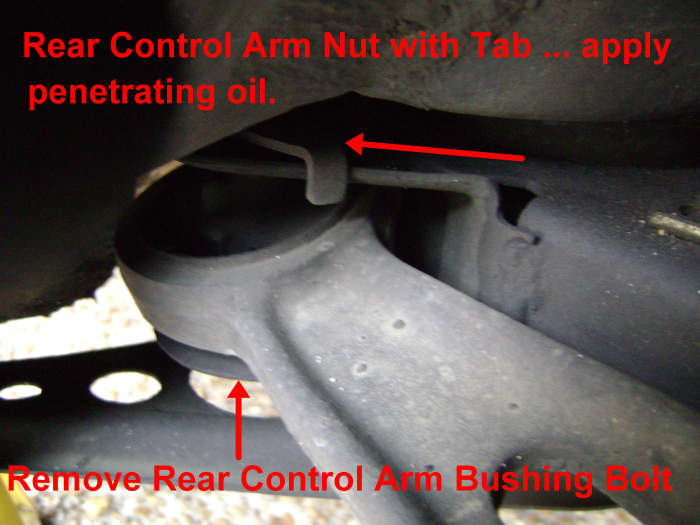
Camry Rear Control Arm Bushing
Camry Rear Control Arm Bushing
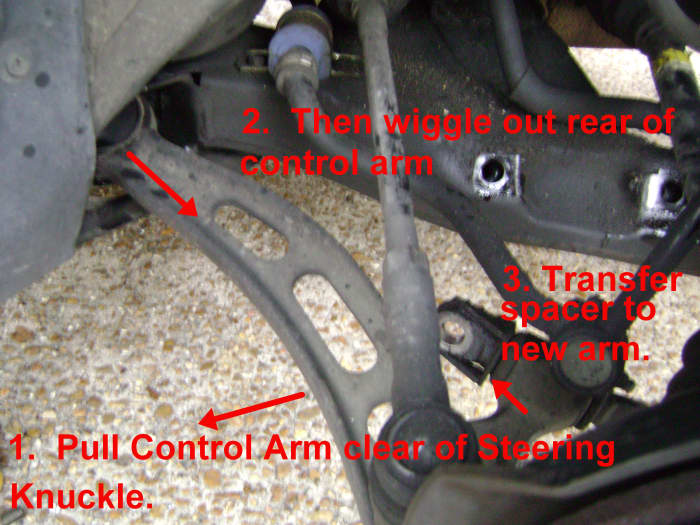
7. Pull the ball-joint end of the control arm away from the steering knuckle; then pull and wiggle out the rear of the control arm away from the subframe control arm bracket. Do not forget to transfer the front bushing's spacer from the old arm to the new arm.
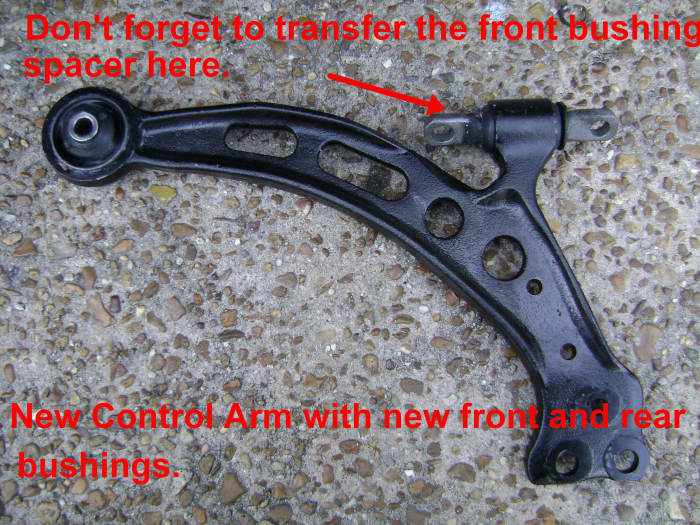
New Camry control arm with new front and rear bushings
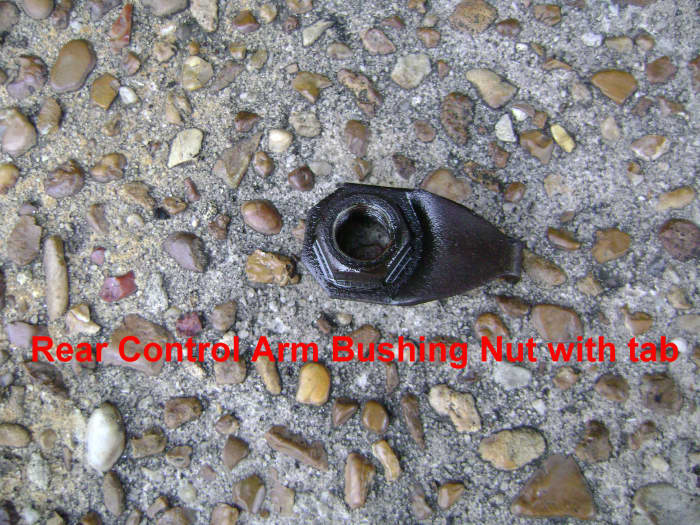
Camry rear control arm bushing nut with anti-spin tab
Installation of the New Control Arm
You can install the new control arm by just reversing the steps for removing the old one. The difficult part is screwing the rear control arm bolt onto the nut. Push or screw the bolt through the rear bushing until the tip of the bolt is barely above the subframe rear control arm bracket; then using your fingertips, position the nut where you think the tip of the bolt is protruding and begin turning the bolt. When the bolt threads catch, you can take your fingers off the nut. The nut will spin free until the tab catches the rear control arm mount which will prevent the nut from further spinning.
After completion of the installation, a front end alignment may be in order, because replacing any component involved in steering or alignment will usually disrupt the existing alignment.
Video: Replacing the Front Strut, Control Arm, and Sway Bar Link
This video shows these front suspension parts being replaced on a 2001 Avalon.
This article is accurate and true to the best of the author's knowledge. Content is for informational or entertainment purposes only and does not substitute for personal counsel or professional advice in business, financial, legal, or technical matters.
Questions & Answers
Question: I'm replacing both control arms of my Toyota, but I see only one spacer for the bushing on the driver side. is this correct?
Answer: Yes, that is correct. There's only one spacer.
Question: At any speed above 40 mph, the steering wheel of my car shakes. Below 40 it's fine. When I am above 40 anytime I accelerate or decelerate, the steering wheel shakes. Even when applying the brakes. Does my problem braking sound like a lower control arm issue in my 2002 Avalon?
Answer: High-speed shaking could be one of the following: 1. Tires are out of round. The only solution is to replace the tire. You can have it checked out at a tire center that has a "Road Force" machine that checks for the roundness of the tire. 2. The wheel is out of balance. Have the wheel rebalanced at a tire center. 3. CV Axle is bent or the CV bearing cage is worn out. Replace the CV axle. 4. The wheel is bent. Either replace the wheel or have a shop repair it that specializes in fixing bent wheels.
Worn control arm bushings result in torque steering problems at low speeds during acceleration or braking.
Question: Replaced front lower control arm rearward bushings with MOOG K200786 (in Sep 2018) but they didn't last. Who makes quality bushings for 2000 Lexus ES300? Mevotech?
Answer: Moog parts are warrantied for life ... but if you want a suitable replacement, Mevotech is good quality.
Question: I have a 2004 highlander and I had all 4 wheels replaced. It didnt pull to the left before that but now it does. I also did the alignment as recommended because the front wheels were worn on the inside. The the reason I had the wheels replaced was also because at 70mph it starts shaking/vibrating. Now they are saying the pull is due to worn control arm bushing. The vibrating is now gone. What could be the real problem?
Answer: An imbalance in tire pressure could cause vibration and a pull but the pressure difference would have to be a lot. If the control arm bushings are worn, they wouldn't be able to perform a good wheel alignment. Not uncommon for the bushing to wear out with high mileage vehicles. Recently been replacing a lot of cv axles as the cause of wheel vibration over 40 mph. If you hit a big pothole, the bearings or bearing cage in the cv axle housing gets damaged resulting in the nonconcentric rotation of the axle shaft.
© 2013 hardlymoving
Posted by: dyandyancammone0269847.blogspot.com
Source: https://axleaddict.com/auto-repair/DIY-Toyota-Lower-Control-Arm-with-Bushing-Replacement
